Version control with Git#
Introduction#
Version control, also known as revision control or source control, is the management and tracking of changes to computer code and other certain other types of data in an automated way.
Any project (collections of files in directories) under version control has changes and additions/deletions to its files and directories recorded and archived over time so that you can recall specific versions later.
Version control is in fact the technology embedded in the versioning of various word processor and spreadsheet applications (e.g., Google Docs, Overleaf).
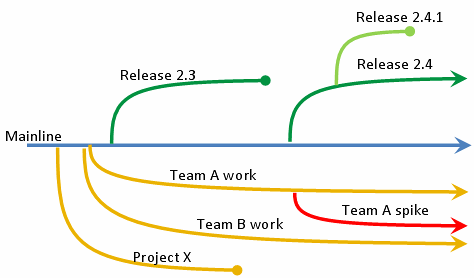
Fig. 6 An overview of how version control works. Some of the project mainline’s branches may eventually be merged back into the mainline if they are successful in achieving some objective that is worth integrating into the mainline.#
Why Version Control?#
With version control of biological computing projects, you can:
record all changes made to a set of files and directories, including text (usually ASCII) data files, so that you can access any previous version of the files
“roll back” data, code, documents that are in plain text format (other file formats can also be versioned; see section on binary files below).
collaborate more easily with others on developing new code or writing documents – branch (and merge) projects
back up your project (but git is not a backup software - see sections on binary and large files below).
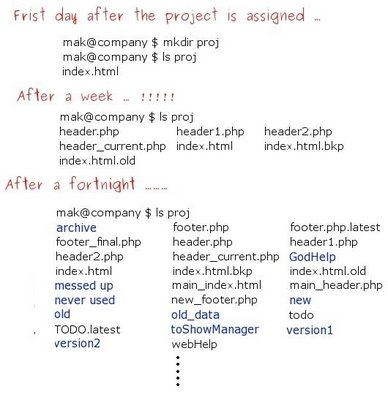
Fig. 7 This will very likely happen if you don’t use Version Control.
(Source: maktoons.blogspot.com).#
Why git ?#
We will use git, developed by Linus Torvalds, the “Linu” in Linux. This is currently the most popular tool for version control. It is a distributed version control system designed to handle everything from small to very large projects with speed and efficiency. It allows multiple developers to work on a project simultaneously without overwriting each other’s changes, facilitating collaboration and maintaining a history of all modifications.
The man advantages of Git are:
Distributed System: Every developer has a complete copy of the project on their computer, including its history.
Efficiency: Fast performance for both local and remote operations.
Data Integrity: Every file and project snapshot is checked for data integrity.
Flexibility: Supports “non-linear” development workflows through branching and merging.
Collaboration: Facilitates teamwork by allowing multiple people to work on different parts (typically on separate branches) simultaneously.
Let’s get started!#
In git, each user stores a complete local copy of the project, including the history and all versions (the “repository”). So you do not rely as much on a centralized (“remote” - somewhere else, accessible through the internet) server.
The Git repository is a directory that contains your project’s files and the entire history of changes made to those files. Here is a graphical outline of the git repository, workflow and command structure:
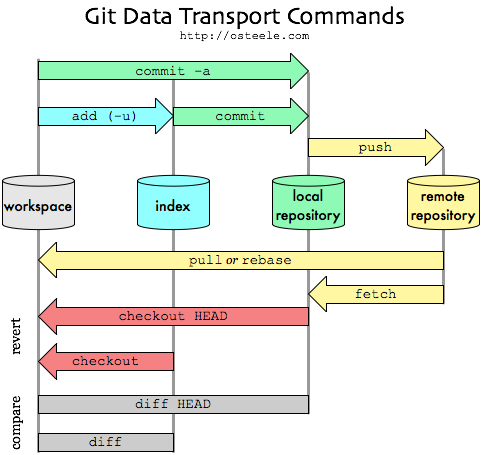
Fig. 8 The git repository, workflow and command structure. - The “workspace” is your working directory - the actual files and folders you see and edit. The index” is your staging area (more on this below) - a place where you can group changes you want to commit together. The “local repository” contains the database of all objects (commits, files (“blobs”), directories (“trees”), etc.) in your repository along with their metadata. The index and the actual data (the objects) associated with each repo snapshot you commit are all all inside a hidden directory named .git that sits within your project directory.#
There are several core git concepts and commands that you need to understand. But first things first - let’s first install get and set up your first git repository!
Installing and configuring git#
Warning
This is a JupyterLite notebook. Code cells here will not work for this particular chapter. Follow the instructions and run the commands on your terminal/console.
But first things first - let’s first install git and set up your first git repository!
Tip
Installing git on your machine: If you do not have git installed already:
On Linux, use a package manager of your choice to install
git(e.g.,sudo apt-get install giton Ubuntu).On Mac, install using
homebrewfirst (if you haven’t already — google to install it) and then usebrew install git).On Windows, install
gitfrom here. You can also install GitHub Desktop, which includesgitas well.
Let’s install and configure git and create a repository.
Note
In what follows, I will sometimes show the expected output from a command:
```bash
pwd
```

```
/home/YourUserName
```
Your first repository#
Time to bring your TMQB coursework under version control. First, let’s navigate to it:
Then initialize your local git repository:
git init
Initialised empty Git repository in /home/mhasoba/Documents/CMEECourseWork/.git/
Create your README file (as a markdown document, so with the .md extension):
echo "My CMEE Coursework Repository" > README.md
Check again git config --list to see if anything has changed.
Check the files and directories that have been created:
ll #same as "ls -al"
Note
Note the hidden .git directory! (More on this below).
Add the README (AKA “stage” it for for a git commit):
git add README.md
Check the current status of your repository:
git status
On branch main

No commits yet

Changes to be committed:
  (use "git rm --cached <file>..." to unstage)
	new file:   README.md

Untracked files:
  (use "git add <file>..." to include in what will be committed)
	week1/
	week2/
This tells you that there are local changes that need to be committed.
git commit -m "Added README file."
[main (root-commit) b2a73ef] Added README file.
 1 file changed, 1 insertion(+)
 create mode 100644 README.md
Tip
In git commands, you can also combine flags like in base UNIX commands; so you can both, add (-a flag) and commit (-m flag) at one go, with -am.
Check status again:
git status
On branch main
Untracked files:
  (use "git add <file>..." to include in what will be committed)
	week1/
	week2/

nothing added to commit but untracked files present (use "git add" to track)
What does it say now? - Compare with the above output of git status.
You can also add changes matching a particular pattern.
For example
git add *.txt
will add all text files that were changed since last commit.
Note that this adds ALL changes that match the pattern, recursively (through all sub-directories).
Next you can commit the rest of these files inside your current coursework (e.g., week 1) with another message, just like you did for readme above:
Warning
Before making your first commit, please read the section about “Ignoring files” below.
git commit -m "Full first commit of new project"
On branch main
Untracked files:
  (use "git add <file>..." to include in what will be committed)
	week1/
	week2/

nothing added to commit but untracked files present (use "git add" to track)
git status
On branch main
Untracked files:
  (use "git add <file>..." to include in what will be committed)
	week1/
	week2/

nothing added to commit but untracked files present (use "git add" to track)
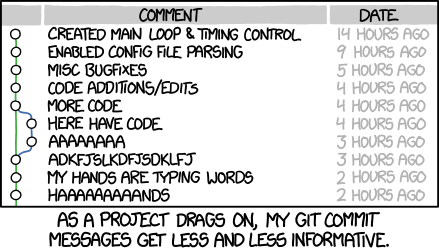
Fig. 9 Make meaningful comments in your git commit. Please don’t neglect to make each commit message meaningful. And use this mantra: “commit often, comment always”. The correct meaning of “often” in this context comes with experience.
(Source: XKCD)#
Writing Good Commit Messages#
A good commit message helps you and others understand what changed and why. Follow these guidelines:
Structure:
First line (subject): Short summary (50 characters or less)
Blank line
Body (optional): Detailed explanation of what and why
Best Practices:
Use the imperative mood: “Add feature” not “Added feature” or “Adds feature”
Be specific: “Fix data import bug for CSV files” not “Fix bug”
Explain why, not just what: “Add data validation to prevent negative values”
For group work: Include your initials (e.g., “JS: Add plotting functions”)
Capitalize the first word
No period at the end of the subject line
Examples:
✅ Good:
Add function to calculate species richness

This function takes a community matrix and returns the number
of species per site. Includes handling for missing data.
JS: Fix temperature conversion bug

Corrected Fahrenheit to Celsius formula (was using addition
instead of subtraction). Closes #23.
❌ Poor:
updated stuff
fixed it
Tip
Linking Commits to Issues: Reference issue numbers in commit messages (e.g., “Fixes #42”) to automatically link commits to GitHub issues and close them when merged.
Commits#
A commit is a snapshot of your repository at a specific point in time. Each commit records:
The changes made (differences from the previous commit).
Metadata such as the author, date, and a commit message.
A unique hash that identifies the commit.
Note
The unique hash (SHA-1 checksum) in Git is a 40-character hexadecimal string. It looks like this:
e83c5163316f89bfbde7d9ab23ca2e25604af290
(You will soon see examples of this below)
It is generated by applying the SHA-1 (Secure Hash Algorithm 1) cryptographic function to the contents and metadata of a Git object. OK, that was some serious Gobbledygook! All you need to know is that this hash acts as a unique identifier for all commits, files, directories, and other objects within a Git repo so that you can track specific snapshots of the repo.
How Git Stores Data#
Git doesn’t store data as a series of changes or differences, but as a series of snapshots of the entire repository. When you make a commit, Git stores a reference to the staged snapshot and a pointer to the commit that came immediately before it.
Git uses four types of Objects to store data:
Blobs: Stores file data.
Trees: Represents directories and contains pointers to blobs and other trees.
Commits: Points to a tree object (snapshot of the working directory), parent commits, and includes metadata.
Tags: Points to another object (usually a commit) and includes metadata.
These objects are stored in the .git/objects directory and are identified by their SHA-1 hash.
Basic git commands#
Here are some fundamentally important git commands (please make sure you read more about them):
Command |
What it does |
|---|---|
|
Initialize a new repository |
|
Download a repository from a remote server |
|
Show the current status |
|
Show differences between commits |
|
Blame somebody for the changes! |
|
Show commit history |
|
Commit changes to current branch |
|
Show branches |
|
Create new branch |
|
Switch to a different commit/branch called |
|
Gather commits info from a remote branch to your current local branch without merging them |
|
Merge two or more versions of one or more files |
|
Upload from remote repository (this is effectively the same as |
|
Send changes to remote repository |
There are more git commands which you will also learn, but it is important that you familiarize yourself with these ones in particular first.
The most common sequence of your git work and commands will be:
Edit Files: Modify files in your working directory.
Stage Changes: Use
git add <file>to add changes to the staging area.Committ Changes: Use
git commit -m "commit message"to save changes to the repository.
But before you do that, you will always want to
Use
git statusto see the status of your working directory and staging area.Use
git logto view the commit history.
Your remote repository#
Remote repositories are versions of your project hosted on the internet or another network. Common platforms include GitHub, GitLab, and Bitbucket.
Nothing has been sent to the remote server yet (more on the remote server below).
So let’s go to your online git service (e.g., github) and set up. Note that github and bitbucket both give you unlimited free private repositories if you register with an academic email. Not a big deal if you will not be writing private code, handy if you are (can you think of examples when you would need to write private code?).
So let’s proceed with connecting your local git repository to your remote server:
Login to your github or bitbucket account
Set up your
ssh-based access. SSH (SecureSocket Shell) is a protocol that allows you to connect to and interact with remote servers. Here are two sets of guidelines (you can use whichever seems easier to you, irrespective of whether you are using githib or bitbucket):
Note
When accessing remote Git repositories, you have the option to use either HTTPS or SSH protocols. Both methods have their own advantages and disadvantages, and the better choice depends on your specific needs and circumstances.
In general, use SSH if:
You interact with Git repositories frequently.
You prefer a secure, key-based authentication method.
You’re setting up automated scripts or development workflows.
Use HTTPS if:
You’re in a restrictive network environment where SSH is blocked.
You prefer a simpler setup without managing SSH keys.
You’re accessing repositories infrequently or from different machines.
We will use SSH beause it is generally better for regular code development due to its security and convenience after the initial setup. You may need to use HTTPS in situations where network restrictions apply.
Next, create a new repository on your remote service with the same name as your local project (e.g.,
CMEECourseWork), and push your new project to this newly created remote git repository. Instructions for this step are here:
Note that you have already done the git init step, so no need to repeat those bits.
You are done. Now you can really start to use git!
The first step after having created your remote repository and added your ssh key to it, is to link the remote to your local repo (as the instructions in web pages linked above will already have told you).
The command will look like this:
git remote add origin git@github.com:YourGithubUsername/CMEECourseWork.git
Then list the URLs of the remote repositories associated with your local Git repository
git remote -v
The output would look like this
origin  git@github.com:YourGithubUsername/CMEECourseWork.git (fetch)
origin  git@github.com:YourGithubUsername/CMEECourseWork.git (push)
The output provides both fetch and push URLs for each remote, showing where Git pulls updates from and where it pushes updates to. This is helpful for understanding which remote repository is set as the target for various Git commands.
In the above example output:
originis the name of the remote (the default name for the main remote when cloning the repository).https://github.com/username/repo-name.gitis the URL for the remote repository on GitHub.In this case
fetchandpushhave that the same URL for both fetching updates and pushing commits.
No you can git push all your local commits:
git push origin main
This pushes the (committed) changes in your local repository up to the remote repository you specified as the origin. Note that main refers to the branch (you currently only have one). Until recently, the default was master, so you may see that on older repositories. More on branching below.
Note
Only when you push or fetch do you need an internet connection, because before that you are only archiving in a local (hidden) repository (that sits in a hidden .git directory within your project).
General command sequence for connecting to Remotes#
Here the a general sequence of commands for connecting a new remote
Add the Remote: Use
git remote add <name> <url>to connect your local repository to a remote one.Fetch Changes: Use
git fetch <remote>to download commits, files, and references from a remote repository.Pull Changes: Use
git pullto fetch and integrate changes from a remote repository into your current branch.Push Changes: Use
git push <remote> <branch>to upload your commits to a remote repository.
Branching#
Imagine you want to try something out, but you are not sure it will work well.
For example, say you want to rewrite the Introduction of your \(\LaTeX\) paper using a different angle, or you want to see whether switching to a new library or package for a piece of code improves speed. What you then need is branching, which creates a project copy in which you can experiment.
git branch anexperiment
git branch
  anexperiment
* main
git tells you that you have two branches.
Warning
If you are not seeing this specific output (with two branches) at this stage of your git chapter work, scroll back and re-check / rerun the above sequence of commands again!
git checkout anexperiment
Switched to branch 'anexperiment'
git branch
* anexperiment
  main
git tells you that you have successfully switched to the new branch
Or if you want to create and switch to a new branch immediately, you can use the -b flag:
git checkout -b anexperiment
Now make a change (update the Readme to record the new naughty thing you have started doing!):
echo "I am going to try this new naughty thing on this experimental branch!" >> README.md
cat README.md
My CMEE Coursework Repository
I am going to try this new naughty thing on this experimental branch!
git commit -am “Testing experimental branch”
The -am flag performs the commit with a message while also automatically staging certain changes before committing.
Specifically, the a part of the flag stages all changes to tracked files (files that have already been committed at least once). This flag does not stage new, untracked files; you must use git add to stage those separately.
Now if you decide to merge the new branch after modifying it:
git checkout main
M	README.md
Switched to branch 'main'
git merge anexperiment
Already up-to-date.
cat README.md
My CMEE Coursework Repository
I am going to try this new naughty thing on this experimental branch!
Unless there are conflicts, i.e., some other files that you changed locally had diverged from those files in the main branch in the meantime (say, due to new changes pushed by another collaborator), you are done, and you can delete the branch:
git branch -d anexperiment
Deleted branch anexperiment (was 3fbab16).
If instead you are not satisfied with the result, and you want to abandon the branch:
git branch -D anexperiment
Note
If there are conflicts between branches, Git will notify you. You’ll need to resolve these conflicts manually in the files and then stage the resolved files with git add, followed by a git commit to complete the merge.
Obvously, we have been just messing around, so you don’t really want the Readme of your main branch to say what it is currently saying!
To fix this, you now have two options: edit the Readme back to the state you wanted (and then add, commit and push), or use the git reset --hard command. However, use the latter with caution. Before you do anything to reverse the merge, read about resetting and revertinf below.
Tip
When you want to test something out, always branch! Reverting changes, especially in code, is typically painful. Merging can be tricky, especially if multiple people have simultaneously worked on a particular document. In the worst-case scenario, you may want to delete the local copy and re-clone the remote repository.
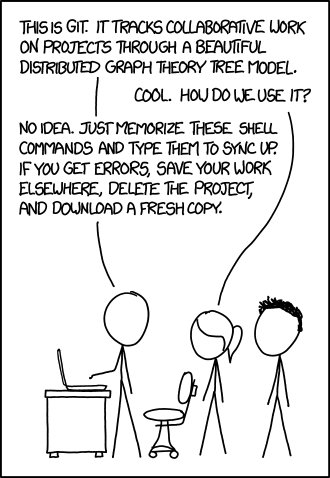
Fig. 10 Try not to do this. But most of us mortals will have, at some point!
(Source: XKCD)#
Note
You can perform Git branching and merging entirely within a local repository without needing a remote.
Key concepts#
Here are some of the key concepts in the working of git:
Repository, workflow and command structure#
Repository, workflow and command structure. - The “workspace” is your working directory - the actual files and folders you see and edit. The “index” is your staging area (more on this below) - a place where you can group changes you want to commit together. The “local repository” contains the database of all objects (commits, files (“blobs”), directories (“trees”), etc.) in your repository along with their metadata. The index and the actual data (the objects) associated with each repo snapshot you commit are all inside a hidden directory named .git that sits within your project directory.

Fig. 11 The different components of a git repository and the commands used to move data between them. Source.#
All git commands must be issued from inside the directory (repository) that you have initialized using git init, and within which the hidden .git directory resides.
Commits#
Commits. A commit is an action or rather, snapshot that records changes to the repository. Each commit typically represents a set of related changes (e.g., bug fixes, a new feature, documentation updates), and is associated with a unique ID (we will see this later), an Author, and a timestamp. This allows you to revert to these individual snapshots and track the history of your project.
Git, as opposed to many other version control software you may have encountered (e.g., Word’s “track changes”), tracks every version of every file as discrete “snapshots”, rather than just the changes or “diffs”. Git’s snapshot-based approach makes operations like switching between branches or merging changes faster and more reliable. It also allows you to efficiently restore any previous version of the project. Here’s a nice visualisation of how commits and snapshots work.
Branch#
Branch. A “branch” is an independent line of development in a project repository. The default branch is typically called main (or master for backwards compatibility in older versions of git).
New branches can be created at any point in the project’s history (we will learn about this later). Branches enable multiple lines of development in a repository, such as working on new features or bug fixes without affecting the stable main branch. When a branch is ready, it is “merged” back to main branch or another branch.
Hash#
Hash. A commit hash is a 40-character unique identifier for a commit (You will see these later — they look like: d94cd91). It is generated by applying the SHA-1 (Secure Hash Algorithm 1) cryptographic function to the contents and metadata of a Git object. OK, that was some serious Gobbledygook! All you need to know is that this hash acts as a unique identifier for all commits, files, directories, and other objects within a Git repo so that you can track specific snapshots of the repo.
Common git commands#
Here’s a list of the most common git commands:
Status check: Use
git statusto see the current state of the repository.Stage changes: Use
git add <file>to stage files for commit.Commit Changes: Use
git commit -m "commit message"to save changes to the repository.View history: Use
git logto view commit history.Create a branch: Use
git branch <branch_name>to create a new branch.Switch branch: Use
git checkout <branch_name>to switch to a different branch.Merge branches: Use
git merge <branch_name>to merge changes from one branch to another.Clone repository: Use
git clone <URL>to copy a repository from a remote server.Push changes: Use
git pushto upload local changes to a remote repository.Pull changes: Use
git pullto fetch and merge changes from a remote repository.
The README file#
A README (like the README.md that you created in your git repo above) is a text file that introduces and explains a project. It contains information that is required to understand what the project is about and how to use or run it.
While READMEs can be written in any text file format, Markdown (saved as an .md file) is most commonly used, as it allows you to add simple text formatting easily. Two other formats that you might most often see are plain text and reStructuredText (saved as an .rst file, common in Python projects).
Essential README Components#
You can find many README file suggestions (and templates) online. Essentially, it should ideally have the following features/content:
Project name / title: Clear, descriptive name for your project
Brief description: What your project does and/or is for. Provide context and add links to any references to help new visitors understand the purpose and scope
Languages: List language(s) and their versions used in the project (e.g., Python 3.11, R 4.3.0)
Dependencies: What special packages (which are not part of standard libraries of the language(s) used) might be needed for a new user to run your project. Include version numbers if specific versions are required
Installation: Guidelines for installing the project (if applicable), including dependencies. Provide step-by-step instructions for setting up the environment
Project structure: Brief overview of the repository organization (main directories and their purposes)
Usage: How to run/use the project. Include command-line examples or code snippets. Explain what specific key files do (no need to list every file, such as data or experimental ones like those in
sandbox)Author name and contact: List all contributors with their roles (especially important for group projects)
Additional Components for Group Projects#
For group coursework, your README should also include:
Team members: Names and contributions of each team member (with link to
CONTRIBUTIONS.mdfor details)Division of work: High-level overview of who worked on which components (detailed documentation belongs in
CONTRIBUTIONS.md)How to run tests: If you have unit tests, explain how to execute them
Known issues: Any bugs or limitations that users should be aware of
Optional Components#
In addition, you may want to include (but not necessary for your current coursework):
License: Specifies how others can use your code
Acknowledgments: Credit external code, datasets, or assistance
Contributing guidelines: Instructions for others who want to contribute
Badges: Status indicators (build status, test coverage, etc.)
Tip
README Best Practices:
Keep it concise but comprehensive
Use clear headings and formatting
Include code examples where helpful
Keep it updated as your project evolves
Test that all instructions actually work on a fresh system
For group projects: Ensure README accurately reflects all team members’ contributions
Important
Assessment Requirement: For group projects, your README must clearly identify all team members and link to your CONTRIBUTIONS.md file. Reviewers will check that your README is informative and professionally formatted.
Further Resources: Search online for “README best practices” or “README templates” for additional guidance and examples.
Ignoring Files#
You will have some files you don’t want to track (log files, temporary files, executables, etc). You can ignore entire classes of files with .gitignore.
\(\star\) Let’s try it (make sure you are in your coursework directory (e.g., CMEECourseWork)):
echo -e "*~ \n*.tmp" > .gitignore
cat .gitignore
*~
*.tmp
git add .gitignore
touch temporary.tmp
Then,
git add *
You can also create a global gitignore file that lists rules for files to be ignored in every Git repository on your computer.
Tip
Templates for .gitignore: You can find standard .gitignore templates online. For example, search for “.gitignore templates”.
Directory and file patterns for gitignoring#
It’s important that you use the correct patterns for what to ignore in your .gitignore, to make sure that all the correct directories and files are being excluded. Note that you can put additonal .gitignore files in sub-directories if you need more fine-grained control over what is to be ignored, bt it is not necessary, because git-ignoring works recursively (including thorugh sub-directories) as long as you include the correct pattern.
Here are the basic patterns (rules) :
Pattern |
gitignore result |
|---|---|
|
This is a comment - this gitignore entry will be ignored (avoid having any file or directory with |
|
Every file OR directory (because lack of trailing |
|
Every directory (due to the trailing |
|
Every file OR directory named |
|
Every directory named target in the top-most directory (because of the leading and trailing |
|
Every file or directory ending with the extension |
|
Every file or directory ending in |
There are additonal patterns - please see the Readings and Resources section.
.gitignore-ng after commit-ing#
If you find that a file or directory belonging to a pattern that you incuded in your .gitignore fails to be ignored (still comes under version control), it most likely means that you gitignored it AFTER committing and pushing it. In this scenario, you need to use
git rm --cached <file>
for a file, and
git rm -r --cached <folder>
for a directory.
While these commands will not remove the physical file from your local repository, it will remove the files from other locals on their next git pull.
An alternative, safer technique (though one which is definitely more work to maintain) is a whitelist-based approach. This is not necessarily a better or worse way to do things, you are in the end trading your time and effort for increased safety and cleanliness of your repository.
*.*
!.gitignore
!*.R
!*.py
!*.sh
!*.tex
!*.bib
!*.txt
!*.md
!Week1/results/myfirstlatexdoc.tex
Your feedback will be in .txt files, so don’t ignore these!
Working with remote repositories#
Remote repositories are versions of your project hosted on the internet or another network. Common platforms include GitHub, GitLab, and Bitbucket.
Set up a remote git repository#
So let’s go to your online git service (e.g., GitHub) and set up. Note that GitHub and Bitbucket both give you unlimited free private repositories if you register with an academic email. Not a big deal if you will not be writing private code, handy if you are (can you think of examples when you would need to write private code?).
Login to your GitHub or Bitbucket account
Follow the instructions to setup an ssh key to enable cryptography-based interfacing with your remote git repository (Google “how do I do this”):
An alternative, safer technique (though one which is definitely more work to maintain) is a whitelist-based approach. This is not necessarily a better or worse way to do things, you are in the end trading your time and effort for increased safety and cleanliness of your repository. * GitHub
* [bitbucket](https://confluence.atlassian.com/bitbucket/set-up-an-ssh-key-728138079.html)
Create your remote git repository:
Now, following the instructions:
The first step after having created your remote repository and added your ssh key to it, is to link the remote to your local repo (as the instructions in web pages linked above will already have told you).
Dealing with binary files#
A binary file is computer-readable but not human-readable, that is, it cannot be read by opening them in a text viewer. Examples of binary files include compiled executables, zip files, images, word documents and videos. In contrast, text files are stored in a form (usually ASCII) that is human-readable by opening in a text reader (e.g., gedit). Without some git extensions and configurations (coming up next), binary files cannot be properly version-controlled because each version of the entire file is saved as is in a hidden directory in the repository (.git).
However, with some more effort, git can be made to work for binary formats like *.docx or image formats such as *.jpeg, but it is harder to compare versions; have a look at this and this1, and also, this.
Dealing with large files#
As such, git was designed for version control of workflows and software projects, not large files (say, >100mb) (which may be plain-text or binary). Binary files are particularly problematic because each version of the file is saved as is in .git, when you have a large number of versions it means that there are the same number of binary files in the hidden directory (for example 100 \(\times\) >100mb files!).
So please do not keep large files (especially binary files) under version control2. For example, if you are doing GIS work, you may have to handle large raster image files. Do not bring such files under version control. We suggest that you include files larger than some size in your .gitignore. For example, you can use the following bash command:
find . -size +100M | cat >> .gitignore
The 100M means 100 mb – you can reset it to whatever you want.
Then what about code that needs large files? For this, the best approach is write code that scales up with data size. If it works on a 1 mb file, it should also work on a 1000 mb file! If you have written such code, then you can include a smaller file as a MWE (minimum working example).
Tip
And how do you back up your large data files? Remember, version control software like git are not meant for backing up data. The solution is to back up separately, either to an external hard drive or a cloud service. rsync is a great Linux utility for making such backups. Look it up on the ‘net!
You may also explore alternatives such as git-annex (e.g., see this), and git-lfs (e.g., see this).
Tip
Checking size of your git repo: You have two options in Linux/UNIX to check the size of your git repo. You can use (cd to your repo first) du -sh .git, or for more detailed information about what’s using the space, use git count-objects -vH (this will work across platforms as this is a git command).
Pre-Commit Git Hook#
pre-commit is a framework that manages the installation and execution of pre-commit hooks across multiple programming languages (including Python and R). These hooks are scripts that run automatically every time a git commit is made, aborting the commit if the script fails. These can be used to enforce standards in code format and style.
So, how would this be useful in practice?
To avoid the occurrence of a bloated git history, i.e. by mistakenly committing a large file to your repository, a good option is to use the check-added-large-files hook from the pre-commit-hooks package.
This will abort a commit if the file size is too large (default size limit = 500kB).
Here’s how you can install and configure check-added-large-files on Linux:
pip install pre-commitCreate new configuration file
.pre-commit-config.yamlfor configuring thecheck-added-large-fileshook; its contents should look like:
# .pre-commit-config.yaml
repos:
  - repo: https://github.com/pre-commit/pre-commit-hooks
    rev: v5.0.0  # or use the latest version
    hooks:
      - id: check-added-large-files
        args: ['--maxkb=500']  # optional: set a custom size limit in KB
Here,
repois the GitHub repository where thepre-commit-hookspackage is hosted.revis the version of thepre-commit-hooksrepository to use. You can specify a tag (likev5.0.0) or usemainfor the latest version, though pinning to a specific version is best for stability.hooksare a list of hooks to configure:id: Specifies the hook to use, in this case,check-added-large-files.args: Optional argument to set the maximum file size limit (in KB). By default, it is 500 KB, but you can adjust this as needed with--maxkb=<size_in_kb>.
This configuration will ensure that no added files exceed the specified size limit before a commit is allowed.
Note: By default, only files that have been staged for addition to the repository via git add will be checked by the check-added-large-files hook.
To allow the hook to check all files in the repo (both staged and unstaged), add --enforce-all as an argument by modifying the above configuration yaml file with
args: ['--maxkb=1000', '--enforce-all']
The .pre-commit-config.yaml file should be stored in the root directory of your repository. This allows pre-commit to detect the configuration automatically when you run the pre-commit install command, which sets up the hooks for the specific repository. Once set up, pre-commit will refer to this configuration file each time you attempt to make a commit.
To set up the hooks after creating this file, run the following command in the root of your repository:
pre-commit install
This installs the hooks locally, ensuring they run on every commit.
Removing files#
To remove a file (i.e., stop version controlling it) use git rm:
(Note that in this section, the default branch name is set to master. GitHub now sets its default branch to main.)
echo "Text in a file to remove" > FileToRem.txt
git add FileToRem.txt
git commit -am "added a new file that we'll remove later"
[master 706f40d] added a new file that we'll remove later
 2 files changed, 3 insertions(+)
 create mode 100644 .gitignore
 create mode 100644 FileToRem.txt
git rm FileToRem.txt
rm 'FileToRem.txt'
git commit -am "removed the file"
[master 284c62e] removed the file
 1 file changed, 1 deletion(-)
 delete mode 100644 FileToRem.txt
I typically just make all my changes and then just use git add -A for the whole directory (and it’s subdirectories; -A is recursive).
Un-tracking files#
.gitignore will prevent untracked files from being added to the set of files tracked by git. However, git will continue to track any files that are already being tracked. To stop tracking a file you need to remove it from the index. This can be achieved with this command.
git rm --cached <file>
The removal of the file from the head revision will happen on the next commit.
Accessing history of the repository#
To see particular changes introduced, read the repo’s log :
git log
For a more detailed version, add -p at the end.
Reverting to a previous version#
If things go horribly wrong with new changes, you can revert to the previous, “pristine” state:
git reset --hard
git commit -am "returned to previous state" #Note I used -am here
If instead you want to move back in time (temporarily), first find the “hash” for the commit you want to revert to, and then check-out:
git status
And then,
git log
Then, you can
git checkout *version number*
e.g, git checkout 95f7d0
Now you can play around. However, if you do want to commit changes, you create a “branch” (see below). To go back to the future, type
git checkout main
Running git commands on a different directory#
Since git version 1.8.5, you can run git directly on a different directory than the current one using absolute or relative paths. For example, using a relative path, you can do:
git -C ../SomeDir/ status
Tip
Cloning the MulQuaBio repository: You can clone the main repository of this book on your computer and regularly git pull it to keep it updated. That way the these notes and the associated code and data files are easily and locally available on your computer. DO NOT clone the repository into your own coursework repository though!
Running git commands on multiple repositories at once#
For git pulling in multiple subdirectories (each a separate repository), here is an example:
find . -mindepth 1 -maxdepth 1 -type d -print -exec git -C {} pull \;
Breaking down these commands one by one,
find . searches the current directory
-type d finds directories, not files
-mindepth 1 sets min search depth to one sub-directory
-maxdepth 1 sets max search depth to one sub-directory
-exec git -C {} pull \ runs a custom git command one on every git repo found
Using git through a GUI#
There are many nice git GUI’s (Graphical User Interfaces) out there, such as gitKraken. Or if you are using a code editor like Visual Studio Code, there are nice extensions that will give you considerable GUI functionality.
Tip
Checking git status: Always run the git statuscommand on a repository before pulling/fetching from, or pushing to a remote repository!
Collaborative Git Workflows for Group Work#
When working on group projects, Git enables effective collaboration through structured workflows. This section covers best practices for team-based development, which are particularly important for coursework assessments.
Setting Up for Collaboration#
Repository Setup:
One team member creates the repository on GitHub/Bitbucket
Add collaborators with write access (push privileges)
All team members clone the repository to their local machines
Agree on a workflow and naming conventions before starting
Initial Configuration:
# Clone the group repository
git clone git@github.com:username/group-project.git
cd group-project

# Verify you're on the main branch
git status

# Pull the latest changes before starting work
git pull origin main
Branch-Based Development#
Using branches allows team members to work independently without interfering with each other’s code.
Create a Feature Branch:
# Create and switch to a new branch
git checkout -b feature/data-analysis-js

# Or create a branch for a specific module
git checkout -b module/statistical-models
Branch Naming Conventions:
feature/description- For new features (e.g.,feature/plotting-functions)bugfix/description- For fixing bugs (e.g.,bugfix/correct-calculation)module/name- For specific project modules (e.g.,module/data-cleaning)Consider including your initials for clarity (e.g.,
feature/analysis-jsmith)
Work on Your Branch:
# Make changes to your files
# Stage and commit regularly
git add myfile.py
git commit -m "JS: Add data cleaning functions"

# Push your branch to the remote repository
git push origin feature/data-analysis-js
Meaningful Commit Messages for Collaboration#
Good commit messages are essential for tracking individual contributions and understanding project history.
Commit Message Best Practices:
Use the imperative mood: “Add feature” not “Added feature”
Be specific and descriptive: “Add linear regression function” not “Update code”
Include context: Explain why, not just what
For group work: Prefix with initials to track contributions (e.g., “JS: Fix data import bug”)
Keep the first line under 50 characters; add details in subsequent lines if needed
Examples of Good vs Poor Commit Messages:
❌ Poor:
git commit -m "fixed stuff"
git commit -m "updated file"
git commit -m "asdfgh"
✅ Good:
git commit -m "JS: Add function to calculate species diversity"
git commit -m "AM: Fix bug in temperature conversion (Celsius to Kelvin)"
git commit -m "TK: Add unit tests for data validation functions"
Syncing with the Team#
Regularly synchronize your work with the main branch to avoid conflicts.
Before Starting Work:
# Switch to main and pull latest changes
git checkout main
git pull origin main

# Switch back to your feature branch
git checkout feature/your-feature

# Merge main into your branch to stay updated
git merge main
Daily Workflow:
Pull from main at the start of each work session
Work on your feature branch
Commit regularly with meaningful messages
Push your branch to the remote repository
Before finishing, merge main into your branch again to catch any new changes
Handling Merge Conflicts#
Merge conflicts occur when two people modify the same lines of code. They are inevitable in collaborative work but can be resolved systematically.
When Conflicts Occur:
Git will notify you of conflicts when you try to merge or pull:
Auto-merging analysis.R
CONFLICT (content): Merge conflict in analysis.R
Automatic merge failed; fix conflicts and then commit the result.
Identifying Conflicts:
Open the conflicted file. Git marks conflicts like this:
<<<<<<< HEAD
# Your changes
result <- mean(data$temperature)
=======
# Their changes
result <- median(data$temperature)
>>>>>>> main
Resolving Conflicts:
Communicate with your team: Discuss which version to keep or how to combine them
Edit the file: Remove the conflict markers (
<<<<<<<,=======,>>>>>>>) and keep the correct codeTest the resolution: Make sure the code works
Stage and commit:
git add analysis.R
git commit -m "JS: Resolve merge conflict in temperature calculation"
Minimizing Conflicts:
Divide work clearly: Assign different files or functions to different team members
Pull frequently: Sync with main regularly
Communicate: Use issues or comments to coordinate who’s working on what
Small, frequent commits: Easier to resolve conflicts in small changes
Code Review and Merging#
Before merging your work into the main branch, have teammates review your code.
Using Pull Requests (GitHub) / Merge Requests (GitLab):
Push your branch to the remote:
git push origin feature/your-feature
Create a Pull Request on GitHub:
Go to your repository on GitHub
Click “Pull requests” → “New pull request”
Select your feature branch to merge into main
Add a description of your changes
Request review from team members
Review Process:
Teammates review the code
Discuss changes in comments
Make requested modifications
Push updates to the same branch (automatically updates the PR)
Merge when approved:
Click “Merge pull request” on GitHub
Delete the feature branch after merging
Pull the updated main branch locally:
git checkout main
git pull origin main
Tip
Code Review Benefits: Code review isn’t just for catching bugs—it helps team members understand all parts of the project, ensures code quality, and provides documentation of who contributed what.
Contribution Documentation#
For coursework assessments, you must document individual contributions.
Required: CONTRIBUTIONS.md File
Create a CONTRIBUTIONS.md file in your repository documenting:
Who worked on which components
Individual code contributions
Collaboration and communication efforts
Code review participation
See the Group work execution section in the Assessment chapter for detailed requirements and use the provided template.
Tracking Contributions Through Git:
Your Git history provides evidence of individual work:
# View commits by author
git log --author="Jane Smith"

# View detailed statistics
git shortlog -sn

# See who modified each line of a file
git blame filename.py
Important
Assessment Note: Your Git commit history will be reviewed as part of individual assessment. Make sure to:
Commit your own work under your own name
Use meaningful commit messages
Push regularly to demonstrate ongoing contribution
Maintain accurate CONTRIBUTIONS.md documentation
Individual marks account for 40% of group project grades, based on your documented contributions. See the Assessment chapter for full details.
Best Practices for Group Work#
Communication:
Use GitHub Issues or project management tools to track tasks
Comment on commits and pull requests
Hold regular team meetings to coordinate work
Discuss major decisions before implementing them
Organization:
Agree on code style and formatting (consider using linting tools)
Use consistent file and variable naming conventions
Document your code with clear comments
Write README files for each module or component
Version Control Hygiene:
Never commit directly to main without review
Keep branches short-lived (merge frequently)
Delete branches after merging
Use
.gitignoreto exclude unnecessary filesRun
git statusbefore every commit and push
Pre-commit Hooks for Team Consistency:
Set up pre-commit hooks to enforce standards across all team members:
# .pre-commit-config.yaml
repos:
  - repo: https://github.com/pre-commit/pre-commit-hooks
    rev: v4.4.0
    hooks:
      - id: check-added-large-files
        args: ['--maxkb=500']
      - id: trailing-whitespace
      - id: end-of-file-fixer
      - id: check-yaml

  # For Python projects
  - repo: https://github.com/psf/black
    rev: 23.1.0
    hooks:
      - id: black

  # For R projects
  - repo: https://github.com/lorenzwalthert/precommit
    rev: v0.3.2
    hooks:
      - id: style-files
      - id: lintr
This ensures all team members follow the same code formatting and quality standards.
Conflict Resolution#
If disagreements arise within the team about technical decisions or contributions:
Document the issue: Write it down clearly
Discuss as a team: Try to reach consensus
Consult your supervisor: If unresolved, seek guidance from course instructors
Use the peer assessment process: The formal peer assessment (see Assessment chapter) provides a mechanism for addressing contribution imbalances
For serious issues with team dynamics or non-contributing members, contact your course coordinator early—don’t wait until the deadline.
Example Workflow Summary#
Here’s a complete workflow for a typical group work session:
# 1. Start of work session - get latest changes
git checkout main
git pull origin main

# 2. Create or switch to your feature branch
git checkout -b feature/my-analysis

# 3. Work on your code, commit regularly
# ... edit files ...
git add analysis.py
git commit -m "JS: Add species diversity calculation"

# 4. Sync with main to avoid conflicts
git checkout main
git pull origin main
git checkout feature/my-analysis
git merge main
# Resolve any conflicts if they occur

# 5. Push your branch
git push origin feature/my-analysis

# 6. Create pull request on GitHub for team review

# 7. After approval, merge and cleanup
git checkout main
git pull origin main
git branch -d feature/my-analysis  # Delete local branch
Cross-Reference to Assessment#
All collaborative Git practices described here support the assessment criteria outlined in the Assessment chapter. Key points:
Group work quality (60% of group project marks): Measured by code quality, documentation, testing, and Git repository organization
Individual contributions (40% of group project marks): Tracked through Git history, CONTRIBUTIONS.md, and peer assessment
Repository requirements: Proper
.gitignore, meaningful README, clean commit historyPeer assessment: Formal process to evaluate team member contributions
Effective use of Git not only helps you collaborate but also provides the documentation needed for fair individual assessment.
A friendly concluding note on git#
Git can feel hard and unintuitive. It is likely that at some point you will make a mistake and lose some work as a consequence.
THIS IS NORMAL
Don’t worry about it, this has happened to pretty much everyone who has ever used git.
When things like this do happen though, it is imperative that you work out what went wrong so you can make sure it doesn’t happen again.
Questions to ask yourself include:
Did I use
git statusto check what I was adding?Did I commit regularly enough, whenever I had completed a logical section of work?
Did I make sure to only commit code rather than committing data files and outputs too?
Did I make sure to gitignore the things I needed to?
When you get used to working with git, it becomes as natural as juggling chainsaws: i.e. it will always feel a bit odd and strange but it won’t be as scary as it once was.
Next Steps:
Learn Commands: Familiarize yourself with common Git commands.
Explore Branching: Practice creating, switching, and merging branches.
Use Hosting Services: Try using platforms like GitHub to collaborate with others.
Advanced Features: Delve into rebasing, cherry-picking, and submodules for more complex workflows.
Practicals#
Instructions#
Don’t modify anything (or refer to any files) in your local copy of the git repository of these notes (on Github). Copy whatever you need from the main repository to your own repository.
Git commit and push every time you do some significant amount of coding work (after testing it), and then again before the given deadline (this will be announced in class). This includes UnixPrac1.txt from the Unix Chapter.
Push your git repository
The only practical submission for git is pushing your coursework git repository,
.gitignoreandreadmefiles included. Make sure your.gitignorehas meaningful exclusions, and yourreadmehas useful information (as explained in the section above). Also search online “readme good practices” or something like that to find additional tips/info.Also, invite your assessor to your coursework repository (e.g,
CMEECourseWork) repository with write privileges (AKA push privilege in GitHub). The current assessor is s.pawar@imperial.ac.uk (or “mhasoba” on both bitbucket and github).
Readings & Resources#
General#
Excellent book on Git: http://git-scm.com/book
Look up the Bitbucket Git resources
Really great git tutorials: https://try.github.io
Markdown#
A cheatsheet for github-flavored Markdown: adam-p/markdown-here
Committing practices#
Some tips for good commit practices: https://chris.beams.io/posts/git-commit/
.gitignore#
Guidelines for the
.gitignorefile: https://labs.consol.de/development/git/2017/02/22/gitignore.html, https://docs.github.com/en/free-pro-team@latest/github/using-git/ignoring-files
Branching#
Guidelines for brancing: https://gist.github.com/digitaljhelms/4287848
Footnotes
1: There you will find the following phrase: “…one of the most annoying problems known to humanity: version-controlling Microsoft Word documents.”. LOL!
2: None of the computing weeks assessments will require you to use such large files anyway